Maintenance 101

How to Maintain Your Hearing Aids
Our hearing aids aren't just devices, they're our daily companions on our hearing health journey. Learning to care for and maintain your hearing aids not only means you'll get the most out of your hearing experience, but you'll also have them along for the ride for much longer.
Published 3/10/2025,
Updated 6/16/2026
Reviewed by
HearUSA editorial team
Share article
Taking care of hearing aids
How to take care of your hearing aids
Hearing aid maintenance isn't just about keeping them in a safe place and trying not to drop them. There are plenty more ways to ensure you're getting the most out of your devices and keeping them out of harm's way.
Avoiding exposure to too much moisture, cleaning them and storing them at the proper temperature and location are all essential steps when it comes to caring for them.
Take a look at our list of dos and don'ts and learn how you can make hearing aid maintenance a part of your daily routine.
The DOs of hearing aid care
- Store them properly
Make sure to store your hearing aids in a dry, cool place.
Extreme temperatures and moisture can both be very damaging to your hearing devices.
- Protect the batteries
Turn off the batteries when you're not using your hearing aids.
If your hearing aid batteries aren't rechargeable, test them with a digital battery tester and replace them well before they run out.
If they're rechargeable, place them in the charging unit at night.
It's also helpful to remove batteries and clean their contact points occasionally.
- Use a hearing aid dryer
Keeping your hearing aids dry is an essential step in maintaining and extending their lifespan and function.
Sweat and moisture build-up, especially if you live an active life, are inevitable throughout the day.
Using a hearing aid dryer is an efficient way to effectively clean and dry your hearing aids.
The PerfectDry Lux™ from Widex, for example, even uses a UV light to kill up to 99.9% of germs and bacteria.
- Keep them clean
Before touching your hearing aids, make sure to wash your hands to remove any dirt or oil.
Change the wax guard filters on your devices occasionally to remove any unwanted dirt and make sure to use the cloth or brush they came with.
- Take the extra step
Apart from cleaning, storing and charging, you can take other steps in the best interest of your hearing health companion.
When caring for your hearing aids, always do so over a soft surface—just in case you drop them.
When it's cold outside, you can also wear a hat over your ears to help protect your hearing aids from extreme temperatures.
And hey, your ears will thank you, too.
The DON'Ts of hearing aid care
- Get them wet
Don't wear them while your showering or swimming. Your hearing aids have sensitive and delicate technology inside of them and water can damage them.
- Expose them to extremes
Your hearing aids can be damaged if exposed to extreme temperatures or environments.
Make sure you don't store them in direct sunlight, in your car or near a heater.
It's also essential to remove them for CAT, MRI or any other electromagnetic scans.
- Include them in your beauty routine
Heat from a hair dryer, chemicals from your hair spray and oils from other hair and skin products can be damaging to your hearing aids.
It's best to pop them in once you're finished getting ready for the day.
- Endanger your loved ones
The battery is the heart and soul of your hearing device, but it can be deadly if swallowed.
Don't leave your hearing aid batteries in any place they could be picked up and ingested by small children or pets.
Insertion/Removal From Ear
How to Insert and Remove Hearing Aids from Ear
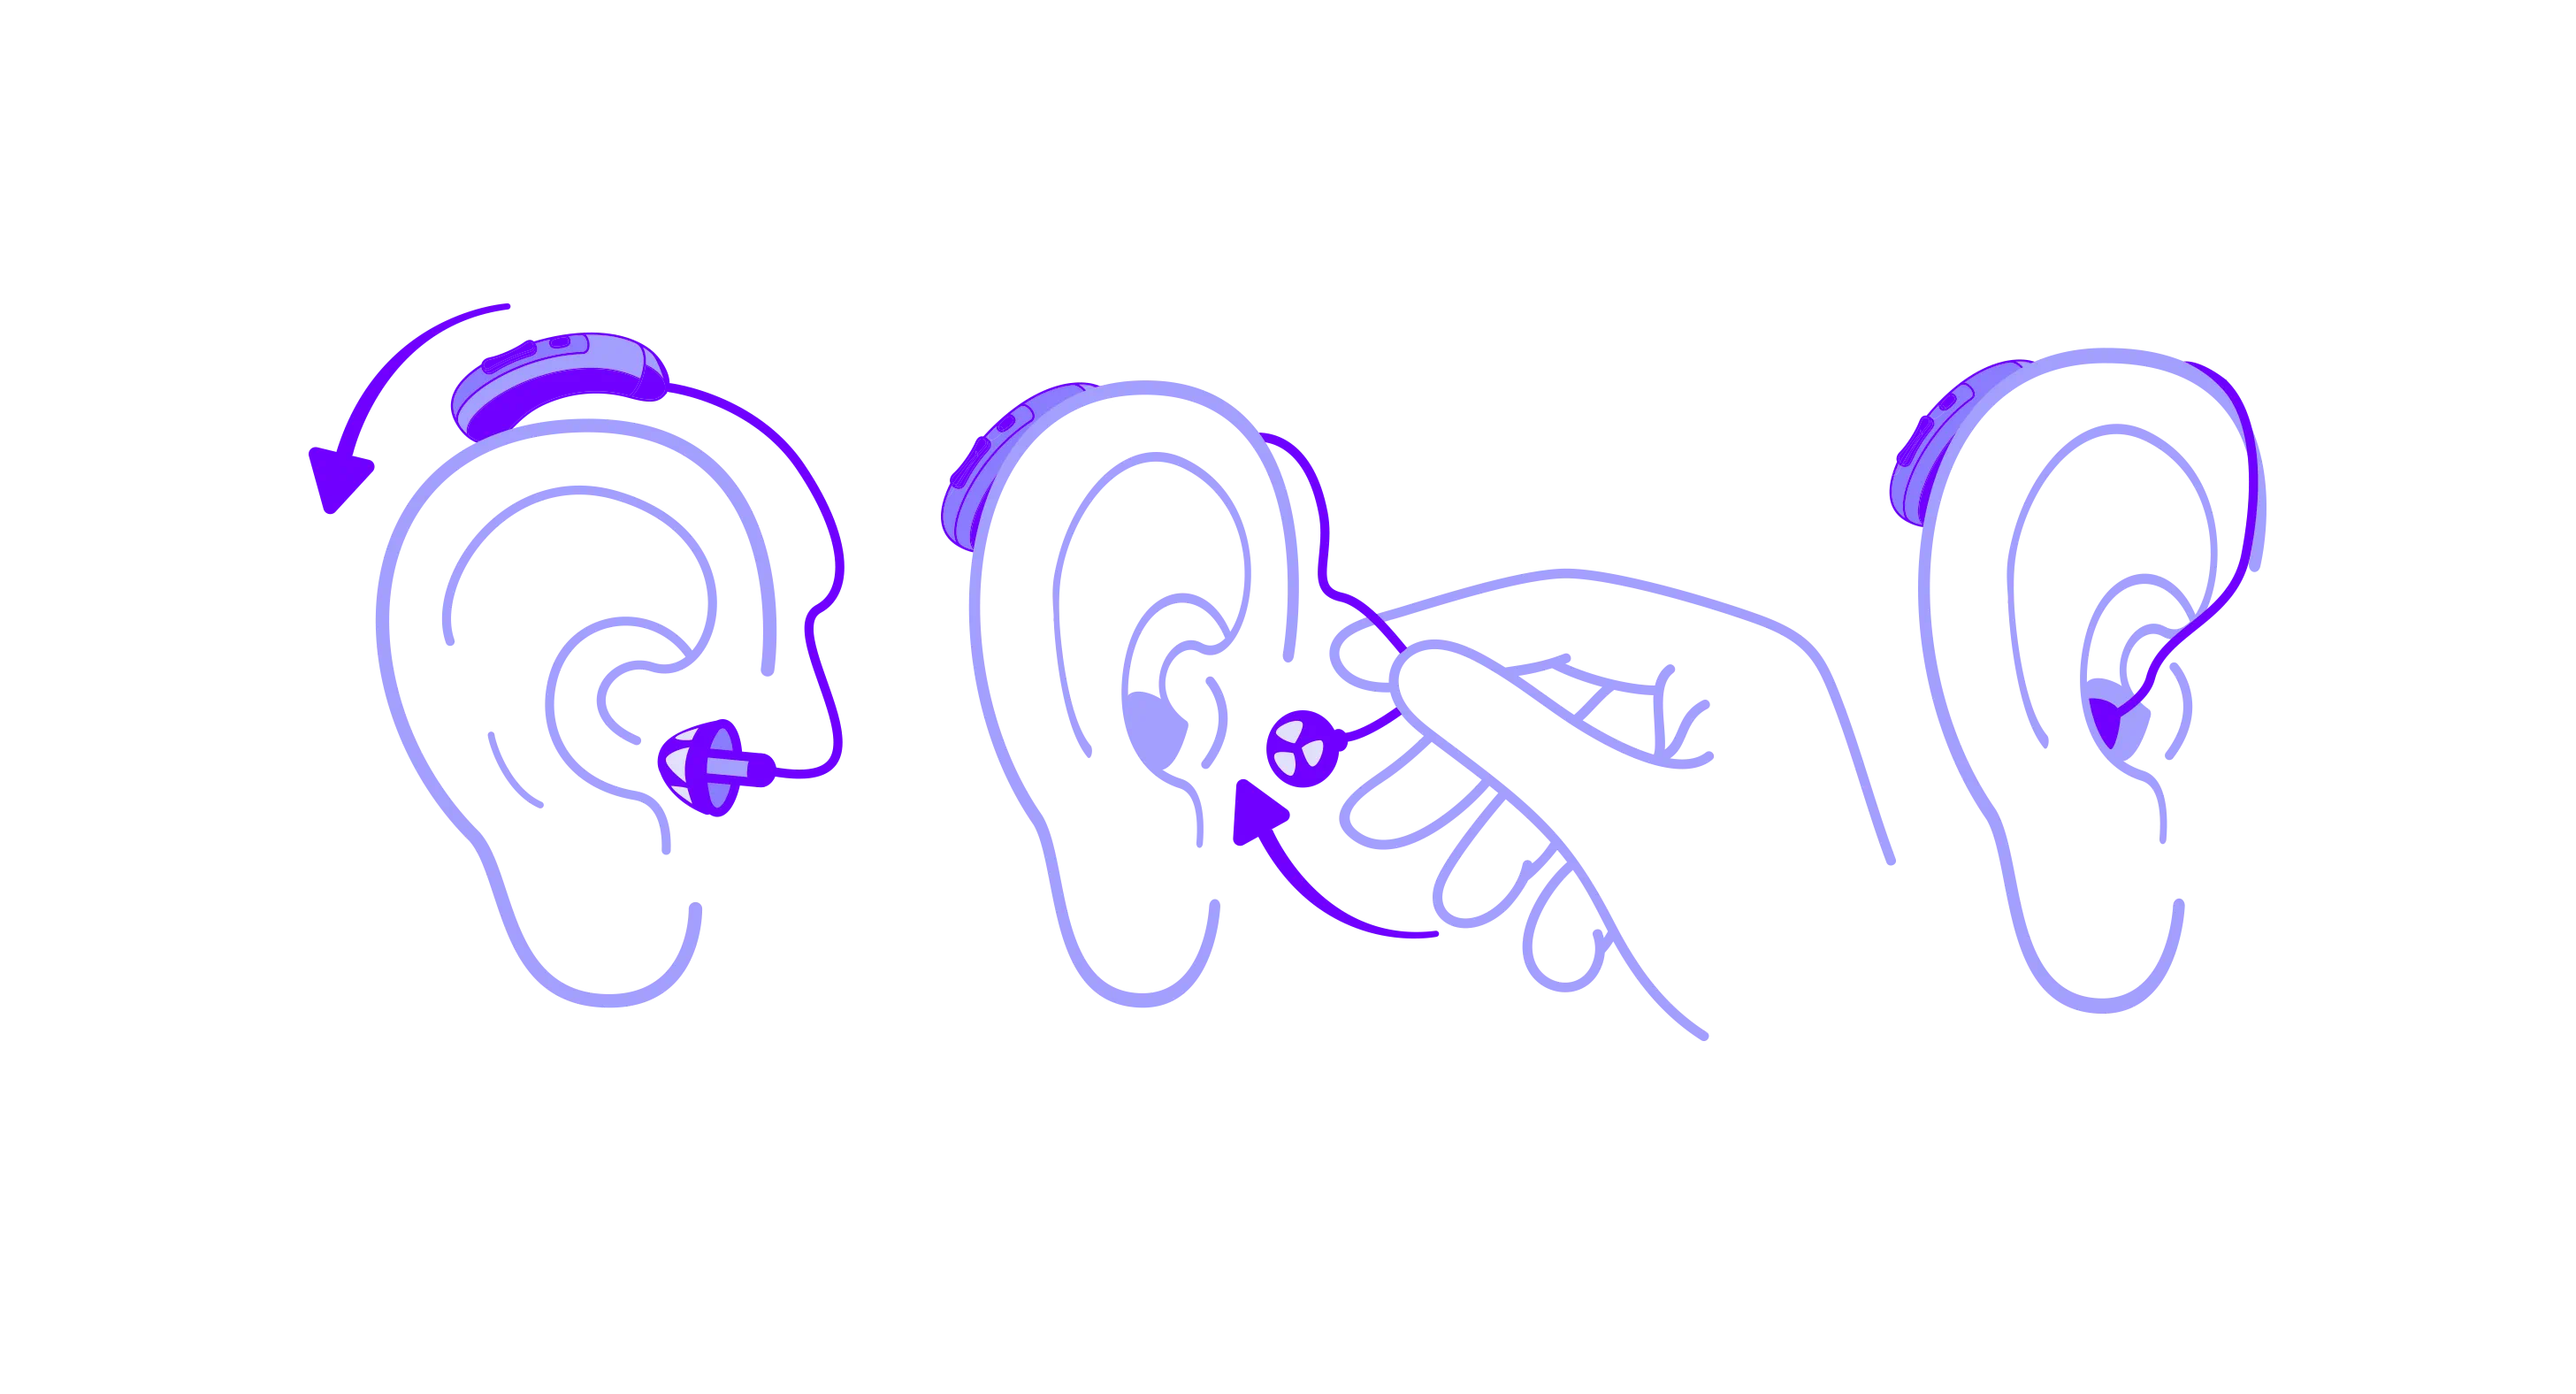
Insertion: Aid goes over top of ear with wire going around and dome inside of ear canal. Once properly inserted, the wire should be directly against the side of the head and nearly invisible.
Removal: Can pull from canal using any part of the aid.
Removal: Can pull from canal using any part of the aid.
Maintenance 101
Simple steps for maintaining your hearing aids
Regular cleaning is essential to the functioning and longevity of your hearing aids' lifespan.
Nevertheless, occasional repairs and updates may also be necessary from time to time.
To ensure the proper functioning of your devices, make sure to:
- Daily cleaning:
Use cleaning brush to brush off any wax on the dome/earpiece that has accumulated throughout the day.
Your Hearing Care Professional can show you how to remove wax and thoroughly clean your device.
- Monthly cleaning:
Approximately every 3 months, domes and filters will need to be replaced.
- Schedule regular check-ups:
Just like we require the occasional doctor's visit to make sure we're fit and healthy, so do your hearing aids.
Schedule a visit to see your Hearing Care Professional every 4 to 6 months so they can ensure everything is functioning the way it should.
Even with the best care, adjustments may need to be made to your hearing aids occasionally.
This may include changing tubes and wax guards, cleaning the receiver and adjusting your sound settings.
The slightest adjustment could make all the difference.
Common causes of damage
Frequent causes of damage of your hearing aids
Our electronic devices are with us wherever we go.
A phone in the back pocket, laptop computer thrown in your bookbag—in the rush of the day, all we can say is “stuff happens".
Your hearing aids are no different. Packed with fine, electric components, things can shift or break in unexpected circumstances.
But there are more likely scenarios and culprits to watch out for:
- Pets and small children getting ahold of them
- Falling out when removing your mask or tighter clothing items
- Putting them in your pockets (and then washing them)
- Accidentally stepping on them when they're pulled out in tight spaces
The best thing you can do to avoid damage in these cases?
Make sure to remove your hearing aids in the same place and store them away from children and pets.
If they do happen to fall out, be aware of your surroundings.
Watch your step, and make sure you don't trip on them.
Make sure to remove your hearing aids in the same place and store them away from children and pets.
If they do happen to fall out, be aware of your surroundings.
Watch your step, and make sure you don't trip on them.
Hearing aid troubleshooting
Fixing common hearing aid issues
If you are unsure why your hearing aids aren't working properly, you can always contact your Hearing Care Professional.
However, there are a few troubleshooting steps you can take first. Sometimes you may find a quick fix to your problem.
However, there are a few troubleshooting steps you can take first. Sometimes you may find a quick fix to your problem.
Check the battery
Charging/Batteries:
- If aids have removeable batteries: Pull the tab off the new battery, let it sit for approximately 5 minutes for them to fully charge (if you do not have 5 minutes, this is ok, the battery will just not last as long). When inserting the battery, the beveled edge goes into the door with the flat side up/facing you. When not wearing, open the battery door to the first click for better battery life and to avoid feedback noise. Batteries will need to be changed every 5-7 days.
- If the aids are rechargeable: Bottom of the hearing aid has a battery contact that connects to the contact in the charger. Once properly inserted in the charger with the charger plugged in, you should see a green flashing light on both sides. Charge every night while sleeping. You should have a solid green light once fully charged.
Change the wax filter
Wax build-up may be affecting the function of your hearing aids. Changing the filter can help remove any unwanted wax, dirt or debris that may be clogging things up.
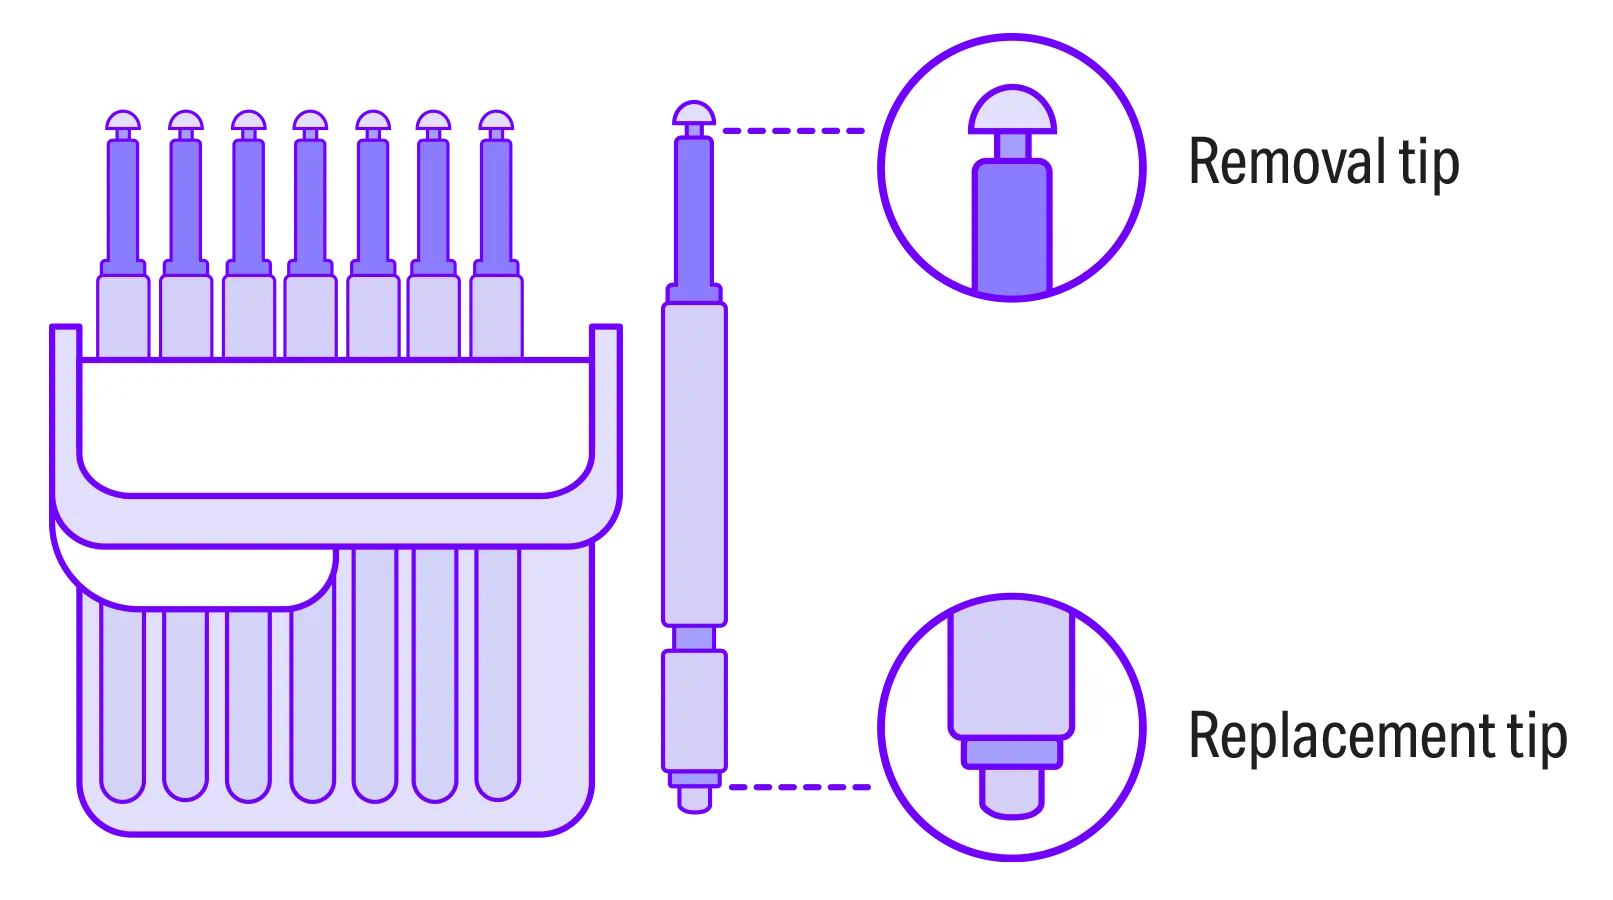
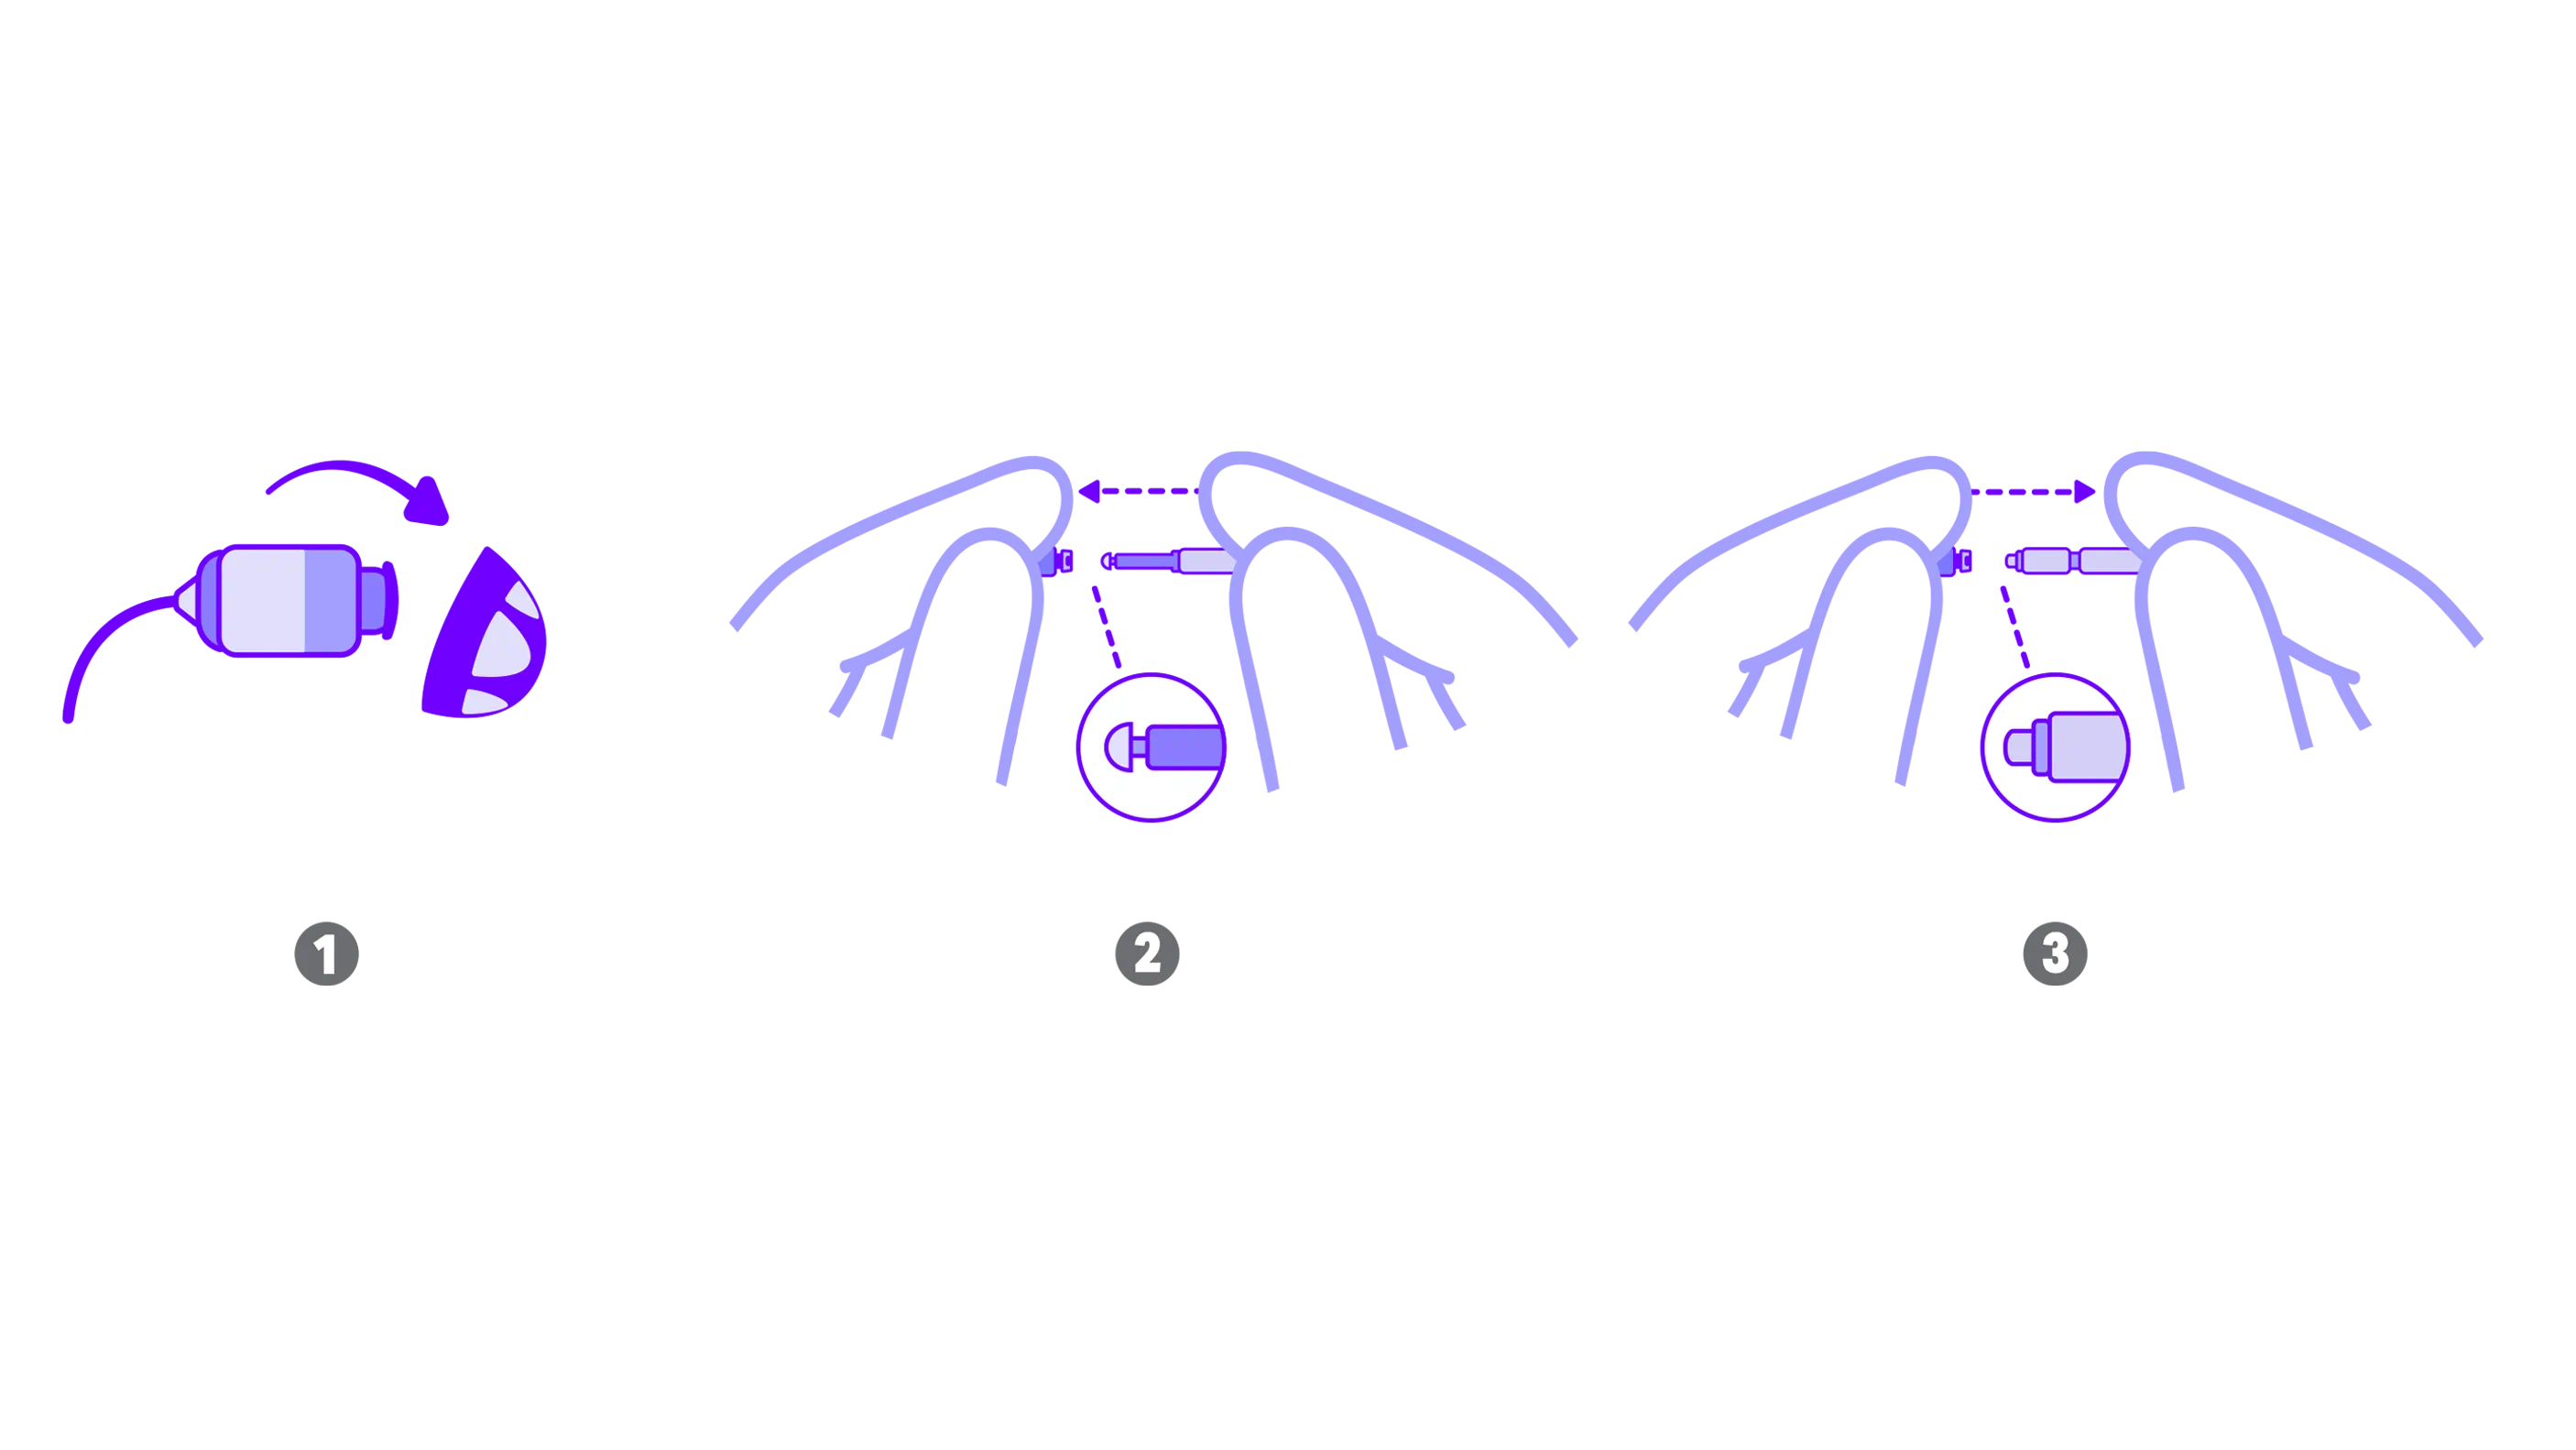
Open the wax guard kit and remove one of the tools. Each tool has a small hook/pin (the removal tip) on one end and a new wax guard on the other. Insert the removal tip into the used wax guard and pull the tool straight out. It is important to pull it straight out and not at an angle. Turn the stick around and insert the new wax guard into the receiver. Pull the tool straight out. Your new wax guard will remain in place. Dispose of the stick. Re-attach the dome (or a replacement dome).
You can also bring aids to clinic every 3-6 months for thorough cleaning, dome and filter replacement.
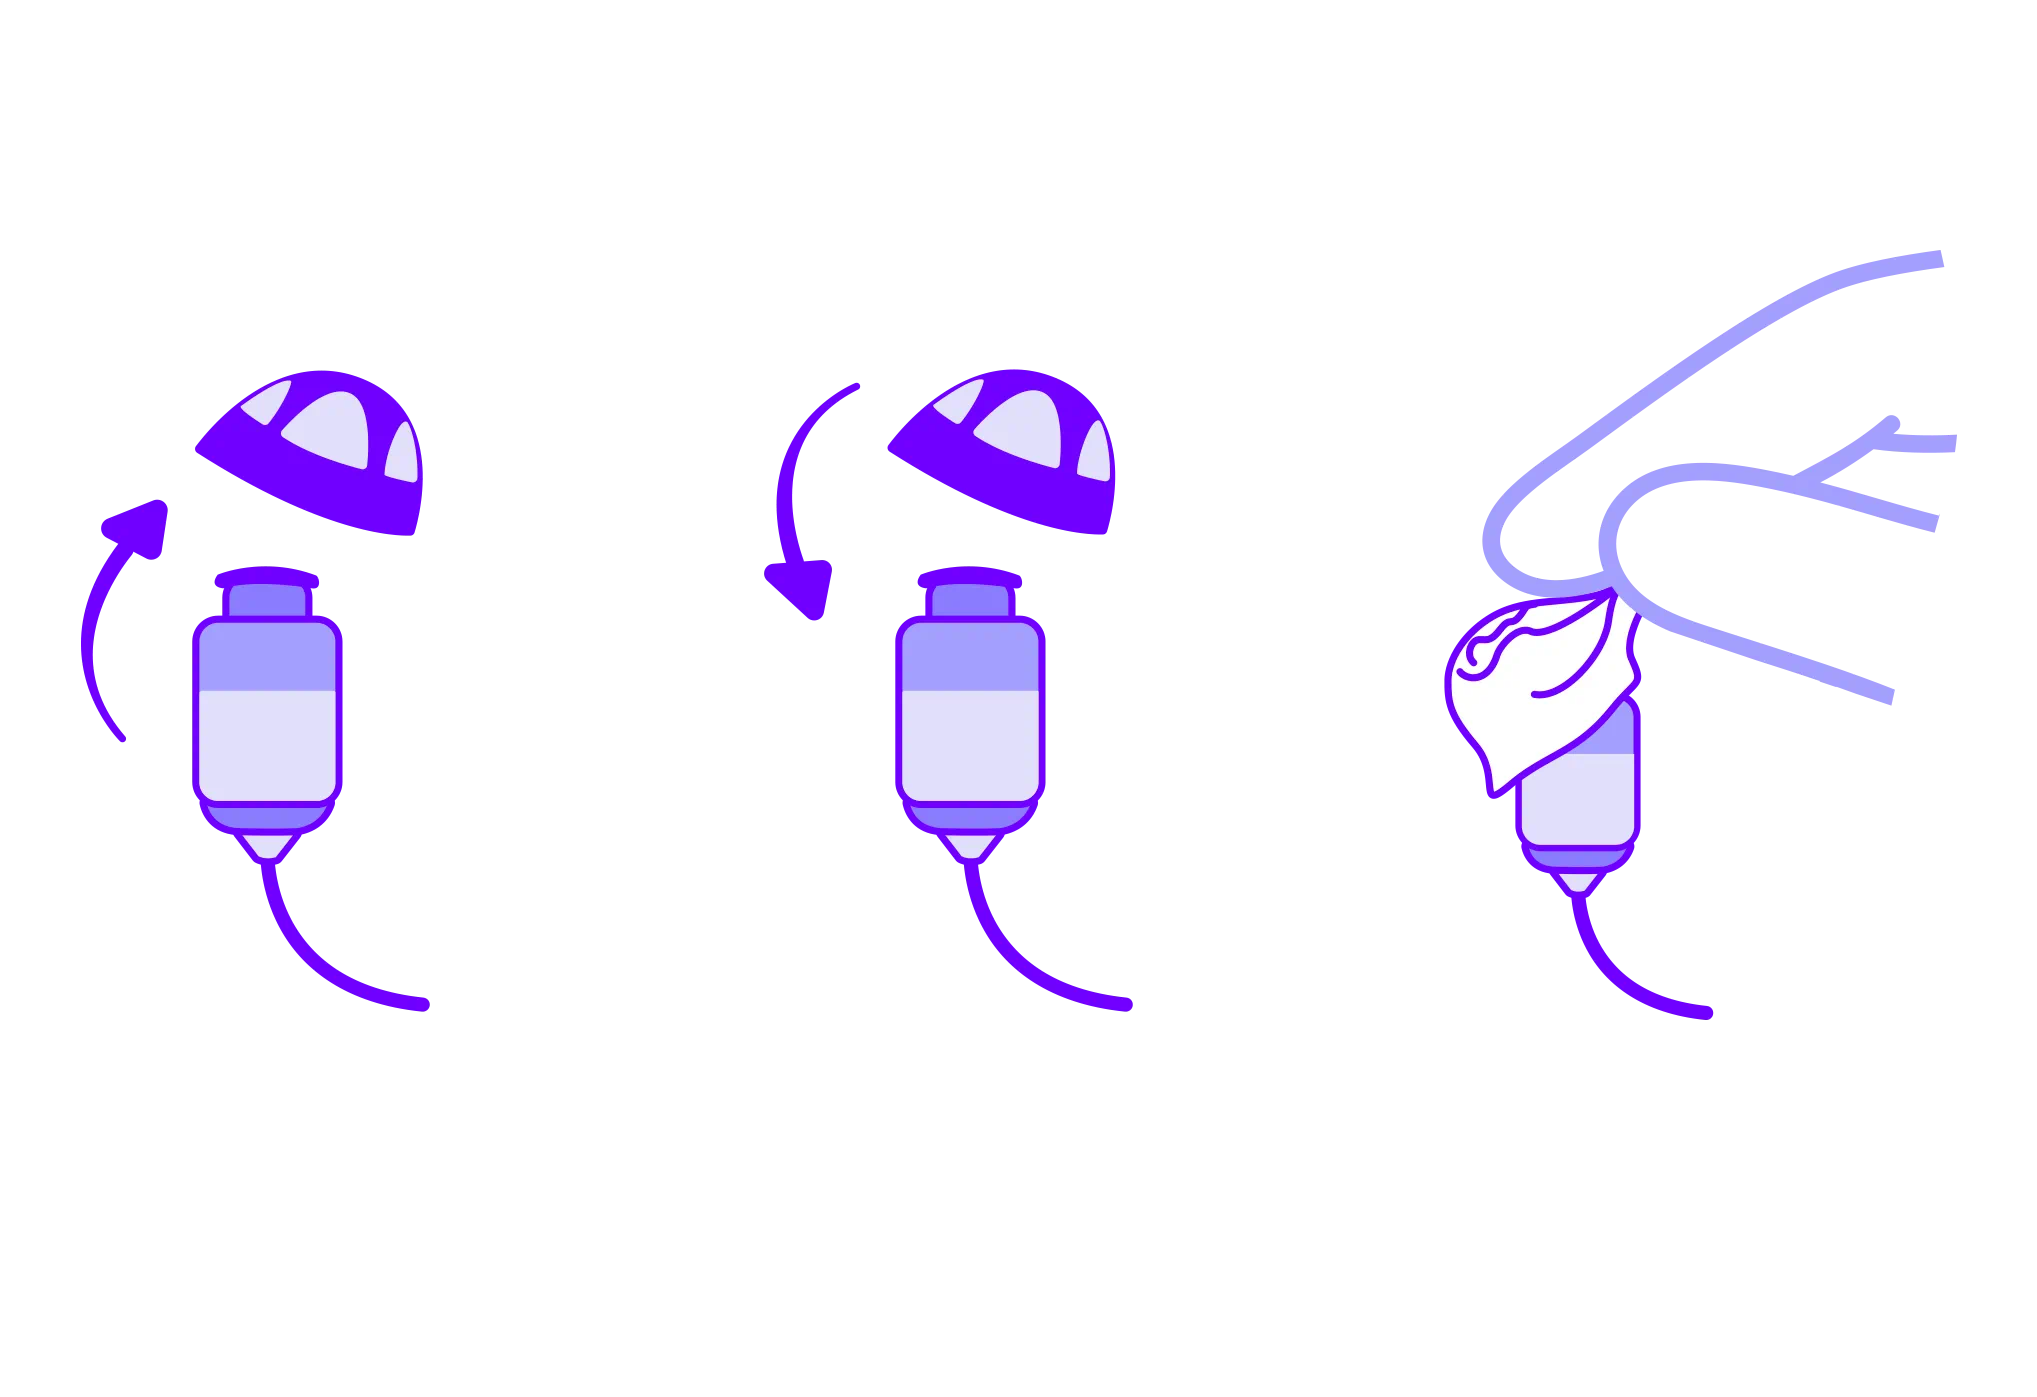
Replace silicone domes
Remove the used dome by pulling it off the receiver and discarding it. Push the new dome over the ribbed end of the receiver.
Check that the dome is securely mounted by carefully lifting the lower part of the dome and verifying that the collar completely covers the ribbed end of the receiver. A gentle tug of the dome will ensure it is securely fastened.
Note: This helps prevent the dome from falling off in your ear canal.
Tube time
The tubes of your hearing aids should be replaced every three to six months. If you start to notice a build-up of debris, contact your Hearing Care Professional for help.
When to reach out
Knowing when to ask for help
If you've tried the troubleshooting tactics above but still aren't getting the most out of your hearing aids, it's time to call in the pros.
Your Hearing Care Professional can help you identify the problem and how to fix it.
Whether it's just a small adjustment or a big repair ahead, you're in good hands with HearUSA.
Don't hesitate to contact HearUSA today to find your local store and book an appointment with one of our experts.
Don't worry, accidents happen
Your hearing aids are there with you for every experience and adventure you have.
That also means they go through the wear and tear of everyday use.
If you notice damage to your hearing aids, don't panic.
Your local HearUSA center and Hearing Care Professional can help make sure they're back up and running at full speed in no time.
Small repairs and cleanings can even be done right in the center.
Bigger repairs will be done by the manufacturer.
Even if your hearing aids aren't covered by warranty, most repairs can be taken care of if the device is less than 5 years old.
A note of caution: If you notice your hearing aids are damaged, do not try to repair them yourself.
This could result in more damage to the device and, in the worst case, may void the "Loss and Damage" or insurance coverage.
Simply call or visit your local HearUSA center and we'll take care of everything!
Share article